Rehabilitation of the athlete consistently challenges athletic trainers to expand to new and exciting rehabilitation techniques. It is widely accepted in the athletic training community that an integrated approach to rehabilitation is what gives the modern athlete the strength and coordination to have a safe return to sport, and quite possibly a preventative approach to future injury. An integrated approach examines the incorporation of core strength with both upper and lower extremity rehabilitation. Incorporating movements into rehabilitation that challenge the area of pathology with areas that are healthy and strong.
Integration of kettlebells is a dynamic functional rehabilitative way to help to maintain mobility, build stability, and build strength in your patient population. Mobility is defined as the ability to move freely and easily. Stability is defined as not likely to change or fail. In our world of rehabilitation this means the ability to withstand a potential force and finally the definition of strength meaning physical power or energy. With the integration of ketttlebells we can get all three for the price of one.
Kettlebell Dead-Lift:
Begin with the use of the kettlebell dead-lift. This movement is the foundation of the kettlbell swing. It all starts with the hips. This movement helps to pattern the hip hinge in patients to help protect their back. Saving patients back from stresses should be on every clinicians mind. Second is the grip on the handle of the kettlebell. With a tight grip this activates the inner and outer core and also activates the rotator cuff of the shoulder and finally the latissimus dorsi in the back. This basic strength movement can help pattern mobility and stability in all basketball athletes. It can help to build strength and stability while down low in the post while the big men are battling for that last second rebound to win the game. Can you ask for any more of an integrated exercise? Why yes you can, please keep reading!
Now that you have patterned the movement of the kettlebell dead-lift, move on to the kettlebell swing. The kettlebell swing incorporates several aspect of the rehabilitation for your patient. First, your patient worked so hard on the glute bridge in the beginning stages of your rehabilitation, activation of the glute complex to decrease activation in the hamstring musculature. The patient then turned prone and worked on building that prone plank. You had that patient performing prone planks for a minute or even more. The core was on, the latissimus dorsi engaged. Little did you know you were already helping to build stability and strength for your patient to perform the kettlebell swing. The kettlebell swing is your answer to a dynamic functional glute bridge and plank with activation of the latissimus dorsi. We all know through reading the literature posted here on BSMPG and through Stuart McGill that the latissimus has an active role in core stability.
The Kettlebell swing = Hip hinge and glute bridge + plank + latissimus dorsi activation in a dynamic functional movement pattern. The kettlebell swing is also a wonderful tool to build on metabolic training. At times the basketball athletes can raise the heart rate to 70-80% of max heart rate while reaching the final seconds of a minute of continuous 2 Hand swings. This can help to pattern the ability of the athlete to transition on the court. It can also help to train them in maintaining perfect form while under the demands of stress.
Begin to work these kettlebell movement patterns into your training program for all your basketball athletes and begin to see the huge benefits that can be gained from working with this tool.
Click HEREto view Art Horne's presentation from this year's National Athletic Trainers Association Annual Meeting and Clinical Symposia.
Stay tuned for an E-Book coming soon which will explore the finer points of everything barefoot and how you too can improve performance and decrease your chance of future injury incorporating some sensible barefoot training into your existing program.
Many athletic trainers, physical therapists and coaches will advocate the in-line lunge position for both the chop and lift exercises with emphasis placed on both the in-line foot position along with a vertical tibia and torso as the optimum position to perform this activity. Although this may be a good starting position to teach the chop as a stability exercise, it may not be the very best position to emphasize the dynamic hip stabilizers and therefore fails to have the greatest carry-over effect to other similar lunging and single leg exercises and ultimately the playing field.
By adopting a position which requires increased levels of hip musculature effort and dynamic stability, this exercise may not only teach appropriate hip and torso position, coordination, and neuromuscular strength but may also serve as a starting position for teaching all split squat and lunging progressions while utilizing the front hip as the primary mover while minimizing the involvement of the back leg. As previously mentioned, the traditional in-line lunge position with a vertical tibia and torso along with 90/90 positions of the hip and knee serve to promote a challenging teaching position for the Chop exercise while inherently limiting how much external load an athlete/patient can move with good form.
What this position also limits however, is the amount of involved “dynamic” front hip musculature activity which is obviously required further down the road during both advanced strength movements and on-field maneuvers . By progressing this exercise from the traditional half kneeling position to a very similar yet more challenging “Hip Dominant” chop serves to not only involve additional hip musculature, but also as a starting point from which to develop and groove a proper split squat pattern.
Traditional Inline Lunge Position (above)
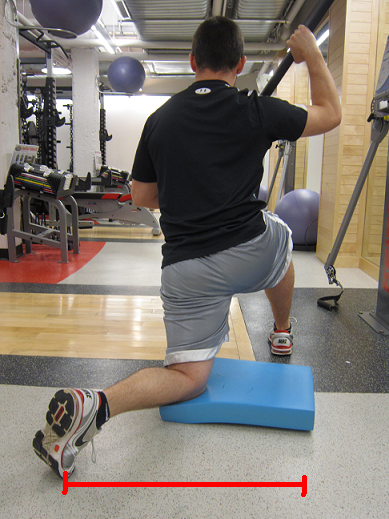
Athlete creating False Stability by creating a wide base (notice wide distance between back foot and front foot)
A Better Way To Chop - note position above
Progressions for teaching and advancing the Chop:
1. Tall Kneeling 2. Traditional Half-Kneeling position (in-line lunge stance) 3. Hip Dominant half – Kneeling (with emphasis on proper position and cueing) 4. Standing Lunge or Squat position.
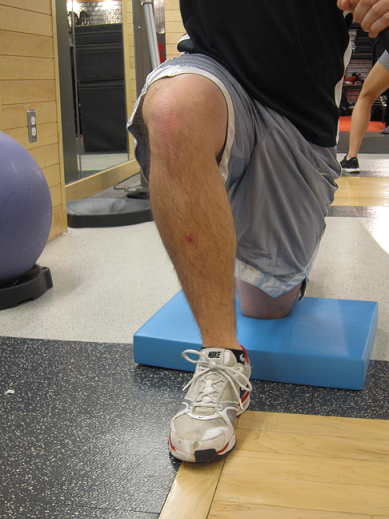
Teaching the Hip Dominant Chop position:
1. Start in lunge position with right foot forward and left knee down. 2. Hips should be square and perpendicular from cable system so to not have right leg abducted and externally rotated and the left leg abducted and internally rotated (with lower leg kicked out providing unwanted artificial stability) (insert picture here) 3. Patient/Athlete should “load” their right hip and glute by leaning slightly to the right. This is the most important point while teaching this position and cannot be overlooked or underappreciated. Without the appropriate amount of lateral shift, the supporting hip will simply rely on its static stabilizers to hold this position, limiting the contribution needed from the targeted dynamic stabilizers and specifically the glutes. 4. Body weight should be over the middle of the front foot with the toes extended under the back foot so to position oneself at the bottom of a perfect split squat. 5. Because of varying tibia and femur lengths, everyone’s position will be slightly different but everyone should answer the same way when asked, “Where do you feel your muscles working?” (Answer: glutes!) and have an angled front tibia as opposed to the 90/90 position so often taught. 6. Not feeling your hip musculature working? Try leaning a bit more laterally. Because this will be a new position for most people, especially for those that do not engage their hips well (dynamic stabilizers) to begin with, many will avoid positioning themselves in this position due to the inherit ‘instability” associated with it – remember, you’re not jamming the head of the femur against the acetabulum and hip labrum anymore utilizing your static stabilizers to hold yourself in place. 7. Try also placing a Valslide or other 2.5 pound plate under the toes of the front foot to further emphasize the mid-foot pressure and hip activation. 8. Proceed with normal Chop mechanics – pull to midline and push away in two distinct movements so to cross the midline of the body. 9. Always have your athlete/patient rise out of this posture after their last rep to further cement this movement pattern and bridge your progression from a static chop exercise into your split squat exercises.
VIDEO OF TRADITIONAL CHOP
VIDEO OF HIP DOMINANT CHOP
From The Ground Up…
Since we all started locomotion from the ground up, it might be worthwhile revisiting this initial position in an effort to get back to a more efficient way of moving. Many physical therapists and movement specialists already suggest teaching the traditional squat pattern from the ground up for those having difficulty with this pattern. I would suggest a similar approach in an effort to re-establish the split squat and lunge movement sequence. By doing so, you’ll be loading the front hip in a single leg emphasis movement and lengthening the hip flexors of the back leg all while moving in a spine sparing strategy.
Sample Progression for Teaching and Advancing Single Leg Movements:
1. Half-kneeling – Hip Dominant - lunge position to standing position (start in kneeling position to teach patients and athletes how to properly move from this position and not from the traditional starting position) 2. Split squat 3. RFE split squat 4. Reverse lunge ** during each single leg exercise, emphasis should be placed on establishing a “Hip Dominant” position while pushing through the front foot/hip and minimizing any contribution from the back leg.
Establishing the Hip Dominant position is a small change but one that can certainly alter the entire course of your training or rehab and ultimately how your athlete/patient will approach and succeed (or fail) with similar movements involving the lower extremity. Imagine the impact you’ll have with a patient or athlete by engaging their active hip “stabilizers” from day one instead of having them rely on a static stabilizing system (anterior hip capsule and labrum).
The devil’s in the details.
My father used to say, “anything worth doing is worth doing right!”
The Chop exercise along with progressions and advanced movements based off of the traditional split squat are clearly worth doing both from a rehabilitation and advanced training perspective and thus should be done with the greatest coaching and attention to detail as possible. Believe me, your patients/athletes will notice the difference immediately – during their activities of daily living, movement efficiency on the field, not to mention a little bit of glute soreness the next day reminding them they’ve done it right.
Thanks to Sarah Cahill, Strength and Conditioning coach at Northeastern University for her insight and coaching help.
It’s easy to get athletes and patients 80% -90% better after injury or surgery. It’s the last 10-20% that sets great rehabilitation specialists apart from their peers.
One of the most overlooked and underappreciated exercises regardless of the type of injury rehabilitation program you’re working with is the Hip Hinge. Teaching it, Grooving it, and then Challenging it under load is rarely seen in most athletic training rooms and physical therapy centers, yet it’s importance in the overall success of your rehab program is paramount. Whether you’re dealing with a low back pain patient or any myriad of lower extremity pathologies, a properly executed hip hinge pattern will ensure not only a smooth transition from rehab to performance but also appropriately challenges your patients during their rehabilitation program with a safe and progressive Ground Based-Function Based exercise.
Take the low back pain patient for example. As Stuart McGill makes mention to, most LBP patients utilize their backs entirely too much during simple everyday tasks such as tying their shoes, picking up objects from the floor and sitting and rising from chairs. By teaching and enabling your patients to accomplish these tasks through a safely executed hip hinge pattern, you’ll affectively be sparing their backs during ADL’s and alleviating perhaps hundreds of subsequent flexion moments throughout the day. By putting these stresses into the hips instead of the low back will enable your patients the opportunity to actually perform strengthening exercises with you during their office/athletic training room visit instead of constantly dealing with pain caused by faulty movement patterns.
No amount of moist heat packs and massage can make up for poor daily back hygiene.
In the case of the anterior knee pain patient, hip hinging allows them an opportunity to load their posterior chain including the glutes and hamstrings (both often neglected since you can’t see them while looking in the mirror) while avoiding loading an already overloaded quadriceps group. Stronger posterior chain muscles equates to less knee pain, not to mention a considerable performance enhancement boost when it comes to jumping and sprinting.
When it comes right down to it, all athletes and patients should be able to separate their hips from their back in both a 2-legged and single leg stance. Whether its knee, hip or other LE injury pain, athletic trainers, physical therapists or performance coaches should be able to look at this movement pattern and address any concerns IN ADDITION to their traditional rehab program. Now it’s up to you to teach them!
How do I start?
The Hip hinge pattern can be easily taught, standardized and grooved with a stick series.
Teaching the Stick Series:
1. Take any stick, PVC pipe, wood dowel, or broom stick and place along their spine. Be sure to keep the stick in contact with three points (head, back and butt crack) throughout entire movement. 2. Reach butt backwards; knees should have slight bend. 3. Start with two feet on ground, progress to single leg stance. 4. This is not a squat pattern! Movement should be through the hips – not a knee dominant movement 5. Maintain a packed neck throughout the series(c-spine in-line with sternum throughout movement). ** This position should also be taught and maintained during over exercises such as the Bird-Dog, but that’s for another post. 6. Be sure to maintain strict form and three points of contact at all times. 7. **While the stick is on the back of the athlete/patient, we continue with a lunge pattern (as shown in the video) which helps solidify their spine position and teaches them to drive through their front foot but is not necessary if you’re only looking to work on the hip hinge pattern.
This Kid Needs Help
Because many of your athletes and patients have never used this hinging strategy before, many will struggle to perform this task at first. Below are three teaching points to correct the most common mistakes while learning the hip hinge.
1. Not reaching back: Many patients will not seek to reach backwards maximally with their hips. Have them stand one foot away from the wall with the stick on their back and reach backwards until they touch the wall behind them. Once they’ve achieved success with a number of repetitions. Slowly inch them forward and repeat until you’ve found a distance and pattern that enables them to maximally flex their hips while maintaining strict form.
2. Athlete squats instead of hinging: As I previously mentioned, many athletes are unfamiliar with this movement and seek out what they know best. And in this case it’s a knee or quad dominant movement pattern. Stand beside your patient and place your hands or a mat in front of their knees and ask them to perform the motion without touching their knees to your hand.
3. Patient still can’t separate hips from lumbar spine: stand to the front of your patient and while attempting to hinge backwards place fingertips in the creases of their hip prompting them to push their hips backwards towards the wall.
Time for a challenge
After you’ve grooved this pattern again and again and again, it’s time to challenge the pattern under a load. This can be accomplished through the: “Wall Touch – Hip Hinge with KB Pick Up/Put Downs”
1. As before, start your athlete one foot away from a wall (maybe just less in beginners) and have them reach back towards the wall with their butt. 2. Maintain three points of contact with the stick on their head, back and butt crack. 3. Remember: This is not a squat pattern – first motion should be back towards the wall and not downwards. 4. Inch outwards and continue to repeat until distance from wall is appropriate for this patient. Once perfected groove and challenge pattern with kettle bell (KB). 5. Place KB between legs but behind heels. Hip Hinge while reaching down with elbows tightly placed against the rib cage. 6. When grabbing the KB,“crush the handle with your grip”, This will pack your shoulders and engage the lats ensuring a strong back position. 7. Instruct your athlete to stand up as if they have a thousand pounds on the top of their head and they’re pushing it straight up. Finish the movement by squeezing glutes at the end. 8. Beginning athletes may have to prop the KB up on small platform as some will not be able to reach the KB initially. Progress exercise by keeping the KB weight the same and continue to peel away layers from under the KB until KB is on the floor. In the case of a super tall athlete or a patient who is lacking hip mobility, the KB may never get to the ground and thus progression of exercise will include increasing KB weight while maintaining starting height.
Once your athlete has perfected this exercise it’s time to prepare them for high end performance. Remember: never exchange more weight or repetitions for a decrease in technique. Demand perfect form each and every rep.
Progression of Two-Leg Hip Hinge with KB includes:
1. Two hand – one KB 2. One hand – one KB 3. Two hand – two KB
Once you’ve mastered the 2-leg hip hinge, a single leg stance progression is appropriate, and a must for any high level athlete but also important for any low back pain patient since this pattern (golf tee pick up) has a very low compressive load on the spine and a key component in every low back pain rehabilitation. Continue to groove this pattern then challenge under load with the “Single Leg (SL) Romanian Deadlift (RDL) KB Pick-Up – Put Downs”.
1. Continue to groove this motion with Stick Series as described above.
Progression of the Single-Leg Hip Hinge includes:
1. Two hands – two KB 2. One hand (opposite) – one KB 3. Athlete may need to start with KB’s on boxes or mats as before in order to get down with good technique. Do not rush this movement. 4. ** Instead of doing 1 set of 8 reps think of doing 8 sets of 1 rep. This will ensure that each repetition is perfect and not rushed through.
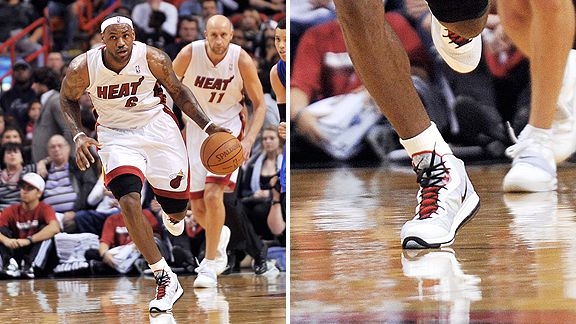
Click HERE to read the original article by Henry Abbott on the differences between how James and Wade run and the impact it may have on their performance and health.
Using nitric oxide to treat tendinopathy. George A C Murrell. Br J Sports Med 2007 41: 227-231
By Art Horne
Below are a few points of emphasis worth noting when discussing this potentially helpful treatment option with your team physician and care group in regards to your basketball athlete and their patellar tendinopathy. Of course, treating the actual source of the patellar pain (hips, lack of ankle dorsiflexion, etc) is always preferred, many troublesome cases require some additional treatment approaches for athletes to get over the hump and back to high level jumping and basketball activities. Clinicians should read both this article in addition to other research articles related to the use of Nitric Oxide in the treatment of tendinopathy prior to considering this as part of your treatment protocol.
Let’s start at the end with the discussion:
DISCUSSION
“NO is important to tendon healing. All three isoforms of NOS, the enzyme that produces NO, are expressed by fibroblasts during tendon healing. Our data in animal studies, cell culture and clinical trails support the hypothesis that NO enhances extracellalar matrix synthesis and results in injured tendons having better material and mechanical properties – that is, the healing tendons are stronger on a per unit area basis than those not exposed to additional NO. The clinical trials show that delivering NO via a patch enhances the clinical recovery of tendinopathy, which is manifested by a reduction in pain, an increase in range of motion and an increase in strength.”
In the three trials outlined below, each used a commercially available NO delivery system (glyceryl trinitrate (GTN). “NO is important for the volume of tissue synthesized during tendon healing. NO is likely to be important in a number of processes, including local blood flow and host defense.”
TENNIS ELBOW “The NO group had less tenderness and could perform more work and had greater power on the Orthopaedic Research Institute-Ankle Strength Testing System testing. The changes were most apparent at week 24. In all, 81% of patients receiving GTN patches were asymptomatic in activities of daily living at 6 months compared with 60% of patients with tendon rehabilitation alone”
ACHILLES TENDON “The NO (GTN) group performed significantly better on hop testing and could generate more peak force at week 24. In all, 78% of patients receiving GTN patches were asymptomatic for activities of daily living at 6 months compared with 49% of patients with tendon rehabilitation alone.”
SUPRASPINATUS TENDINOPATHY “This trial produced the most significant effects. The NO group had significantly reduced shoulder pain with activity and at night, improved range of motion in abduction, forward flexion and external rotation, and improved power in abduction, external rotation, subscapularis and supraspinatus. The changes in supraspinatus power were the most dramatic, and were significant at 6 weeks. In all, 46% of patients receiving GTN patches were asymptomatic for activities of daily living at 6 months compared to 24% of patients with tendon rehabilitation alone.
Points to consider and discuss with your care team: • Although the treatment of knee pain and specifically patellar tendinopathy was not examined in this study, it may be a worthwhile treatment option in the future. • It is important to note that in both the tennis elbow and Achilles tendinopathy that the most apparent results were noted at week 24. • With that said, a treatment program involving Nitric Oxide would still require other treatment options in order to alleviate pain short-term. • Patients should be advised that they may experience headaches while using the patches and blood pressure should be monitored for the first few days to ensure no adverse effects. • For additional resources on Knee Pain and the Basketball athlete visit these links: