Recent Posts
by Art Horne
Many athletic trainers, physical therapists and coaches will advocate the in-line lunge position for both the chop and lift exercises with emphasis placed on both the in-line foot position along with a vertical tibia and torso as the optimum position to perform this activity. Although this may be a good starting position to teach the chop as a stability exercise, it may not be the very best position to emphasize the dynamic hip stabilizers and therefore fails to have the greatest carry-over effect to other similar lunging and single leg exercises and ultimately the playing field.
By adopting a position which requires increased levels of hip musculature effort and dynamic stability, this exercise may not only teach appropriate hip and torso position, coordination, and neuromuscular strength but may also serve as a starting position for teaching all split squat and lunging progressions while utilizing the front hip as the primary mover while minimizing the involvement of the back leg. As previously mentioned, the traditional in-line lunge position with a vertical tibia and torso along with 90/90 positions of the hip and knee serve to promote a challenging teaching position for the Chop exercise while inherently limiting how much external load an athlete/patient can move with good form.
What this position also limits however, is the amount of involved “dynamic” front hip musculature activity which is obviously required further down the road during both advanced strength movements and on-field maneuvers . By progressing this exercise from the traditional half kneeling position to a very similar yet more challenging “Hip Dominant” chop serves to not only involve additional hip musculature, but also as a starting point from which to develop and groove a proper split squat pattern.
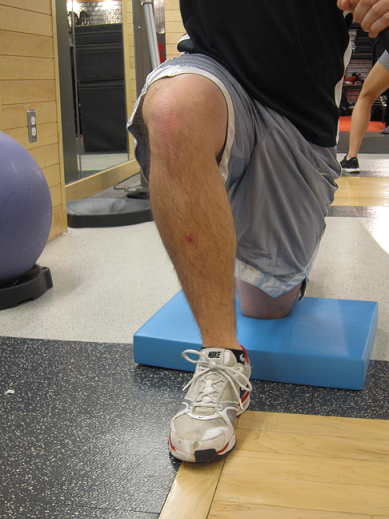
Athlete creating False Stability by creating a wide base (notice wide distance between back foot and front foot)

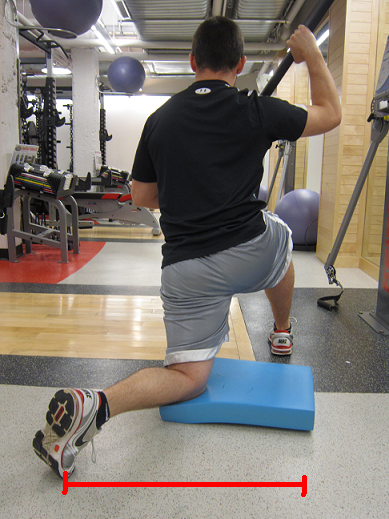
A Better Way To Chop - note position above
Progressions for teaching and advancing the Chop:
1. Tall Kneeling
2. Traditional Half-Kneeling position (in-line lunge stance)
3. Hip Dominant half – Kneeling (with emphasis on proper position and cueing)
4. Standing Lunge or Squat position.
Teaching the Hip Dominant Chop position:
1. Start in lunge position with right foot forward and left knee down.
2. Hips should be square and perpendicular from cable system so to not have right leg abducted and externally rotated and the left leg abducted and internally rotated (with lower leg kicked out providing unwanted artificial stability) (insert picture here)
3. Patient/Athlete should “load” their right hip and glute by leaning slightly to the right. This is the most important point while teaching this position and cannot be overlooked or underappreciated. Without the appropriate amount of lateral shift, the supporting hip will simply rely on its static stabilizers to hold this position, limiting the contribution needed from the targeted dynamic stabilizers and specifically the glutes.
4. Body weight should be over the middle of the front foot with the toes extended under the back foot so to position oneself at the bottom of a perfect split squat.
5. Because of varying tibia and femur lengths, everyone’s position will be slightly different but everyone should answer the same way when asked, “Where do you feel your muscles working?” (Answer: glutes!) and have an angled front tibia as opposed to the 90/90 position so often taught.
6. Not feeling your hip musculature working? Try leaning a bit more laterally. Because this will be a new position for most people, especially for those that do not engage their hips well (dynamic stabilizers) to begin with, many will avoid positioning themselves in this position due to the inherit ‘instability” associated with it – remember, you’re not jamming the head of the femur against the acetabulum and hip labrum anymore utilizing your static stabilizers to hold yourself in place.
7. Try also placing a Valslide or other 2.5 pound plate under the toes of the front foot to further emphasize the mid-foot pressure and hip activation.
8. Proceed with normal Chop mechanics – pull to midline and push away in two distinct movements so to cross the midline of the body.
9. Always have your athlete/patient rise out of this posture after their last rep to further cement this movement pattern and bridge your progression from a static chop exercise into your split squat exercises.
VIDEO OF TRADITIONAL CHOP
VIDEO OF HIP DOMINANT CHOP
From The Ground Up…

Since we all started locomotion from the ground up, it might be worthwhile revisiting this initial position in an effort to get back to a more efficient way of moving. Many physical therapists and movement specialists already suggest teaching the traditional squat pattern from the ground up for those having difficulty with this pattern. I would suggest a similar approach in an effort to re-establish the split squat and lunge movement sequence. By doing so, you’ll be loading the front hip in a single leg emphasis movement and lengthening the hip flexors of the back leg all while moving in a spine sparing strategy.
Sample Progression for Teaching and Advancing Single Leg Movements:
1. Half-kneeling – Hip Dominant - lunge position to standing position (start in kneeling position to teach patients and athletes how to properly move from this position and not from the traditional starting position)
2. Split squat
3. RFE split squat
4. Reverse lunge
** during each single leg exercise, emphasis should be placed on establishing a “Hip Dominant” position while pushing through the front foot/hip and minimizing any contribution from the back leg.
Establishing the Hip Dominant position is a small change but one that can certainly alter the entire course of your training or rehab and ultimately how your athlete/patient will approach and succeed (or fail) with similar movements involving the lower extremity. Imagine the impact you’ll have with a patient or athlete by engaging their active hip “stabilizers” from day one instead of having them rely on a static stabilizing system (anterior hip capsule and labrum).
The devil’s in the details.
My father used to say, “anything worth doing is worth doing right!”
The Chop exercise along with progressions and advanced movements based off of the traditional split squat are clearly worth doing both from a rehabilitation and advanced training perspective and thus should be done with the greatest coaching and attention to detail as possible. Believe me, your patients/athletes will notice the difference immediately – during their activities of daily living, movement efficiency on the field, not to mention a little bit of glute soreness the next day reminding them they’ve done it right.
Thanks to Sarah Cahill, Strength and Conditioning coach at Northeastern University for her insight and coaching help.
Topics: Art Horne, Health & Wellness
by Andy Weigel
It was December 18th, 2010 in Oklahoma City and we had just walked off the court at the Ford Center. We had lost our 6th game of the young season, this one to Oklahoma State, dropping our record to 5-6. This loss unlike the others had a different feel. Although it was a loss, it was a step in the right direction. After the game, we came together as a team and for the first time all year there was a sense of optimism.
We went on to win 16 of our next 21 games, win the SEC West, finish second overall in the SEC and get knocked out in the semi-finals of the SEC tournament to Kentucky. That brought us to selection Sunday. We gathered as a team and watched as all 68 teams were selected, several who we had beaten and others who we had lost to. However, for this tournament we wouldn’t be selected. That moment was a tough one as most coaches know. The dreams of playing in the NCAA tournament for four seniors was now over for good.
Later that night we were selected to the NIT tournament as the overall top seed. The rollercoaster year we had endured was continuing on the same path. This would prove to be another big test of character for our team. The emotional letdown of not making the NCAA tournament is huge! However, we still had a chance to once again come together as a team, continue to advance the direction of the program and compete for a championship in Madison Square Garden.
Our first challenge was hitting the practice court to prepare for our contest against Coastal Carolina. The limited time to prepare for the Chanticleer’s was probably a good thing. We found out late Sunday night that we would be playing at 6 pm on Tuesday. During this time motivation and focus were obstacles. Our team’s vision of being selected into the field of 68 was so strong that not getting in was certainly going to affect us. It was just a matter of how much and for how long. Could we refocus and readjust our vision to a different prize? During the next 48 hours, Coach Grant did a tremendous job of communicating to our players the opportunity we had and what his expectations were. This was coaching at its finest and if you want your athletes to display great character they need to be led by great character.
A different concern we had before our first round game was the atmosphere we would be walking into at home. We had become accustomed to loud sell-out crowds of 15,000 plus for our SEC season. Now, not only was it the NIT, it was also Spring Break! We all predicted dismal attendance numbers but to our delight, over 5,000 of the rowdiest die hard Alabama fans packed Coleman Coliseum. The great thing about the NIT is that seating is general admission, so all of the fans packed the lower portion of the coliseum creating quite an advantage. This spirit gave all of us a great unexpected boost. We went on to beat a very competitive Coastal Carolina team 68-44.
With the NIT, there is some uncertainty of when you’ll play based around ESPN’s broadcast schedule. There are a handful of possibilities, but you really do not know. The waiting game had begun and with that we had a couple days off before preparation for our second round opponent New Mexico. Eventually, our schedule was set for a tip-off at 8 PM on Monday night and the winner would advance to play again on Wednesday with a trip to New York City on the line. After two days away, we came back and had a team lift that went pretty well considering it was Friday at Noon during Spring Break. A few years ago I heard Vern Gambetta speak and he made a comment that has resonated with me ever since. Vern said, “You need to win the workout!” That was a very powerful concept. For the circumstances that we were in, I knew that we needed to “win the workout,” it would have a tremendous impact on the rest of the day. With that in mind, I threw a “game winner” in the workout; bench press. I also added a few cheese and broccoli (great exercise in disguise); clear the hips to curl and press. They get the curl and I get some front butt hip extension with a 1-arm vertical press, we all win. I also threw in a challenge of switch grip pull-ups. One of our player’s strong qualities is that they are ultra-competitive. When they hear “challenge” it gets them excited and that is exactly what switch grip pull-ups will bring out; a competitive challenge. I felt we won the workout which helped us transition into a good practice as well.
After Saturday and Sunday practices we came back Monday ready for a physical and explosive New Mexico team. Our passionate fan base was out in full force again as we prevailed 74-67. Next up were the Miami Hurricanes. The stakes were much higher with a potential trip to New York City and the chance to compete for the NIT Championship in Madison Square Garden. Our new prize was becoming clearer and we were starting to distance ourselves from the heartache of missing out on the NCAA tournament. Not only were the NIT semi-finals at stake but we also had a perfect record at home on the line. Once again Wednesday night, Coleman Coliseum was rocking and we brought home the victory, 79-64 and capped off an undefeated season at home, finishing 19-0! The next step was New York City.
Thursday we let the guys recover physically and mentally with an off day from workouts. On Friday we reconvened and went with a post/guard split. The post players would start in the weight room and get in a 30-40 minute lift, while the guards would be on the court doing skill work. Eventually we would flip flop and I would finish with the guards. The focus was a lot better now as the reality of a championship and playing at “The Garden,” were only a few days away. We practiced Saturday in preparation for our Tuesday contest with Colorado. Sunday morning we flew to New York and checked in at the NIT host hotel, Marriott Marquis. It was conveniently located in the middle of Times Square which has both its advantages and disadvantages. After quickly dropping off our bags and grabbing a snack we headed to practice at NYU in Manhattan. If there is one challenge I haven’t mastered yet, it’s the “post plane practice.” Sitting on a plane for 2 ½ hours, bus for 1 ½ hours, then practicing in an unfamiliar setting with a different, older floor is the recipe for a poor practice. This makes the warm-up really important. Even if practice is not great, their bodies need to be turned on and ready to go. However, this doesn’t guarantee a good practice.
Monday we practiced at Baruch College and then later on headed to an NIT dinner in Central Park. For a tournament banquet to be a success it needs to be short in length, have good food and run smoothly. This one was a success. It met all of those qualities and we even had a chance to take a team picture with a great back drop.
Tuesday was game day and we finally had the chance to shoot around in the Garden. If you’ve never been to the Garden before you’re in for a shock. This was my 2nd time so I knew that it was an older building and currently undergoing renovations. I would say most of our players were shocked by the freight elevator we took from ground level to court level. What makes it special is the history, the atmosphere and the face that it resides in the greatest city in the world. Eventually we made our way onto the court and had a good shoot around. Our semifinal game that night was against an explosive Colorado team, who a few weeks earlier went through the same tournament letdown we had endured. It was a back and forth game and we were fortunate to hang on for the 62-61 victory as Colorado missed a shot at the buzzer. Now our season would end on Thursday night in the NIT championship game.
Wednesday, Coach Grant wanted the players to experience New York while they had the opportunity. So several of us got on our team bus and toured the city for a couple of hours. We viewed Ground Zero, the Statue of Liberty, Ellis Island, and the Brooklyn Bridge. We finished off the trip with a ride to the top of the Empire State Building. Later on we had a walk-through on Wichita State, our opponent in the championship game.
Thursday marked the end of our season and wild ride. We lost a tough one to a really good Wichita State team. I give them tons of credit; they were the better team that day. This was a team who earlier in the season took UCONN to the final minute in Maui. The Shockers, just like us, could have been in the NCAA tournament.
When I look back at our experience, I feel there are a lot of misconceptions about the NIT. It is a good tournament and there is a lot of value to gain. I think it will help our players and program in the long run. I also believe that it will be a confidence boost for our player’s that leads us into the future. The experience can be really rewarding if you approach it the right way. Most importantly the NIT gives you an opportunity to continue playing. Regardless of the heartache of missing the NCAA tournament, if you truly love the game, it won’t matter what tournament you’re in as long as you’re still playing.
Topics: Basketball Related, Andy Weigel
I know Eric Cressey is known as "the baseball guy" but in his latest article outlining his top 5 single leg exercises he demonstrates 5 strength training exercises that are sure to take your basketball training this summer to another level.
Click HERE to read Eric's article.
Topics: Strength Training, Guest Author
By Art Horne
It’s easy to get athletes and patients 80% -90% better after injury or surgery. It’s the last 10-20% that sets great rehabilitation specialists apart from their peers.
One of the most overlooked and underappreciated exercises regardless of the type of injury rehabilitation program you’re working with is the Hip Hinge. Teaching it, Grooving it, and then Challenging it under load is rarely seen in most athletic training rooms and physical therapy centers, yet it’s importance in the overall success of your rehab program is paramount. Whether you’re dealing with a low back pain patient or any myriad of lower extremity pathologies, a properly executed hip hinge pattern will ensure not only a smooth transition from rehab to performance but also appropriately challenges your patients during their rehabilitation program with a safe and progressive Ground Based-Function Based exercise.
Take the low back pain patient for example. As Stuart McGill makes mention to, most LBP patients utilize their backs entirely too much during simple everyday tasks such as tying their shoes, picking up objects from the floor and sitting and rising from chairs. By teaching and enabling your patients to accomplish these tasks through a safely executed hip hinge pattern, you’ll affectively be sparing their backs during ADL’s and alleviating perhaps hundreds of subsequent flexion moments throughout the day. By putting these stresses into the hips instead of the low back will enable your patients the opportunity to actually perform strengthening exercises with you during their office/athletic training room visit instead of constantly dealing with pain caused by faulty movement patterns.
No amount of moist heat packs and massage can make up for poor daily back hygiene.
In the case of the anterior knee pain patient, hip hinging allows them an opportunity to load their posterior chain including the glutes and hamstrings (both often neglected since you can’t see them while looking in the mirror) while avoiding loading an already overloaded quadriceps group. Stronger posterior chain muscles equates to less knee pain, not to mention a considerable performance enhancement boost when it comes to jumping and sprinting.
When it comes right down to it, all athletes and patients should be able to separate their hips from their back in both a 2-legged and single leg stance. Whether its knee, hip or other LE injury pain, athletic trainers, physical therapists or performance coaches should be able to look at this movement pattern and address any concerns IN ADDITION to their traditional rehab program. Now it’s up to you to teach them!
How do I start?
The Hip hinge pattern can be easily taught, standardized and grooved with a stick series.
Teaching the Stick Series:
1. Take any stick, PVC pipe, wood dowel, or broom stick and place along their spine. Be sure to keep the stick in contact with three points (head, back and butt crack) throughout entire movement.
2. Reach butt backwards; knees should have slight bend.
3. Start with two feet on ground, progress to single leg stance.
4. This is not a squat pattern! Movement should be through the hips – not a knee dominant movement
5. Maintain a packed neck throughout the series(c-spine in-line with sternum throughout movement). ** This position should also be taught and maintained during over exercises such as the Bird-Dog, but that’s for another post.
6. Be sure to maintain strict form and three points of contact at all times.
7. **While the stick is on the back of the athlete/patient, we continue with a lunge pattern (as shown in the video) which helps solidify their spine position and teaches them to drive through their front foot but is not necessary if you’re only looking to work on the hip hinge pattern.
This Kid Needs Help
Because many of your athletes and patients have never used this hinging strategy before, many will struggle to perform this task at first. Below are three teaching points to correct the most common mistakes while learning the hip hinge.
1. Not reaching back: Many patients will not seek to reach backwards maximally with their hips. Have them stand one foot away from the wall with the stick on their back and reach backwards until they touch the wall behind them. Once they’ve achieved success with a number of repetitions. Slowly inch them forward and repeat until you’ve found a distance and pattern that enables them to maximally flex their hips while maintaining strict form.
2. Athlete squats instead of hinging: As I previously mentioned, many athletes are unfamiliar with this movement and seek out what they know best. And in this case it’s a knee or quad dominant movement pattern. Stand beside your patient and place your hands or a mat in front of their knees and ask them to perform the motion without touching their knees to your hand.
3. Patient still can’t separate hips from lumbar spine: stand to the front of your patient and while attempting to hinge backwards place fingertips in the creases of their hip prompting them to push their hips backwards towards the wall.
Time for a challenge
After you’ve grooved this pattern again and again and again, it’s time to challenge the pattern under a load. This can be accomplished through the: “Wall Touch – Hip Hinge with KB Pick Up/Put Downs”
1. As before, start your athlete one foot away from a wall (maybe just less in beginners) and have them reach back towards the wall with their butt.
2. Maintain three points of contact with the stick on their head, back and butt crack.
3. Remember: This is not a squat pattern – first motion should be back towards the wall and not downwards.
4. Inch outwards and continue to repeat until distance from wall is appropriate for this patient. Once perfected groove and challenge pattern with kettle bell (KB).
5. Place KB between legs but behind heels. Hip Hinge while reaching down with elbows tightly placed against the rib cage.
6. When grabbing the KB,“crush the handle with your grip”, This will pack your shoulders and engage the lats ensuring a strong back position.
7. Instruct your athlete to stand up as if they have a thousand pounds on the top of their head and they’re pushing it straight up. Finish the movement by squeezing glutes at the end.
8. Beginning athletes may have to prop the KB up on small platform as some will not be able to reach the KB initially. Progress exercise by keeping the KB weight the same and continue to peel away layers from under the KB until KB is on the floor. In the case of a super tall athlete or a patient who is lacking hip mobility, the KB may never get to the ground and thus progression of exercise will include increasing KB weight while maintaining starting height.
Once your athlete has perfected this exercise it’s time to prepare them for high end performance. Remember: never exchange more weight or repetitions for a decrease in technique. Demand perfect form each and every rep.
Progression of Two-Leg Hip Hinge with KB includes:
1. Two hand – one KB
2. One hand – one KB
3. Two hand – two KB
Once you’ve mastered the 2-leg hip hinge, a single leg stance progression is appropriate, and a must for any high level athlete but also important for any low back pain patient since this pattern (golf tee pick up) has a very low compressive load on the spine and a key component in every low back pain rehabilitation.
Continue to groove this pattern then challenge under load with the “Single Leg (SL) Romanian Deadlift (RDL) KB Pick-Up – Put Downs”.
1. Continue to groove this motion with Stick Series as described above.
Progression of the Single-Leg Hip Hinge includes:
1. Two hands – two KB
2. One hand (opposite) – one KB
3. Athlete may need to start with KB’s on boxes or mats as before in order to get down with good technique. Do not rush this movement.
4. ** Instead of doing 1 set of 8 reps think of doing 8 sets of 1 rep. This will ensure that each repetition is perfect and not rushed through.
Topics: Art Horne, Health & Wellness
by Art Horne
I'm a sucker for anything involving self improvement - whether it's nutritional information, strength training, promoting yourself in the workplace and even creating new ideas or improving upon existing practices. So it's no surprise that I've been watching Shark Tank on ABC where small business owners and inventors pitch mulit-million business moguls their trade in hopes of making 'the next big thing".
That all ended recently when I saw a piece of exercise equipment designed to make the push-up easier. Yes, I said easier.
Really? Do we really need a machine to make the push-up easier?

Instead of lowering the bar on exercises, let's make the exercise realistic, attainable and without the aid of an expense piece of equipment.
Gravity too much?
How about starting by doing push-ups with your hands on a table instead of the ground? What about starting with an isometric hold or eccentric push-ups?
Recently Ray Eady from the University of Wisconsin posted probably the best Push-Up Progression I've ever seen and a must read for anyone working with athletes that need some additional upper body strength. So your athlete's can't do a good push-up? No big deal - Learn how to achieve push-up success by reading Ray Eady's Push-Up Progression.
See Ray talk at this year's BSMPG Basketball conference June 3/4th as he discusses the use of isometrics to improve strength and speed in the basketball athlete.
Want to make push-ups easier? Stop giving them a way out and start giving them an appropriate exercise progression which leads to real world strength that translates to on-court success.

Topics: Basketball Related, Art Horne
Click HERE to view this article by Brijesh Patel.
Topics: Basketball Related, Brijesh Patel
Click HERE to read this article by Jay DeMayo, University of Richmond Strength and Conditioning Coach.
Topics: Strength Training, Jay DeMayo
The Off-season is upon us! Watch DeMatha Basketball 1st Off-season strength workout.
Click HERE to view this video.
Topics: Strength Training, Alan Stein
Click HERE to view Jay DeMayo's artice, REAL WORLD STRONG: THE PRESS.
Topics: Strength Training, Jay DeMayo