Boston Sports Medicine and Performance Group, LLC Blog

Back to School - Back to the Basics

Posted by Boston Sports Medicine and Performance Group on Thu, Sep 12, 2013 @ 07:09 AM


With the return of student-athletes to campus, it’s important to remember that not all of these high performing athletes have matching movement IQ’s when it comes to the fundamental hip hinge pattern.  In a previous post, The Hip Hinge: The Best Exercise You're Not Teaching In Your Rehabilitation Program, we discussed the need for this fundamental movement pattern within your current rehabilitation program and detailed a solid progression from the simplest of patterning exercises to high level Kettle bell training. 

Yet, with the return of classes there appears to be a need for a much easier starting point to begin this fundamental pattern from for those athletes that continue to have difficulty performing this pattern, or for those that require feedback when you are not around (ie: home program). 

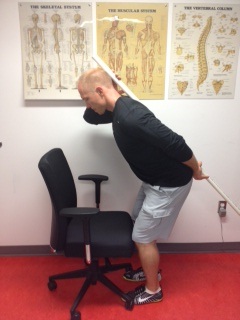
For the most challenging patients, begin this pattern facing a simple office desk chair.  Place your knees to the front edge of the chair while allowing feet to sit underneath. Continue to utilize a broomstick or PVC pipe to ensure your patient maintains a neutral spine while maintaining ALL THREE POINTS OF CONTACT (head, back, butt crack).  By demanding all three points, the athlete is forced to hinge at the hips and NOT perform a squat pattern in an effort to satisfy the exercise request.  Refer back to the previously mentioned article for additional teaching points and progressions.


  • Stand facing chair with knees pressed either directly against edge with feet underneath.

  • While keeping your spine straight and cervical spine in a neutral position, push hips backward.

  • Forehead should travel directly towards top of chair.  Eye gaze should be directly at this point and not upwards which increases likelihood of cervical extension and loss of important joint centration along with neck neutrality.

  • Perform hip hinge pattern without pushing chair forward and/or touching chair edge with knees.  Chair should not move during the execution of this exercise.

  • Be sure to maintain three points of contact with PVC pipe.


hip hinge hip hinge

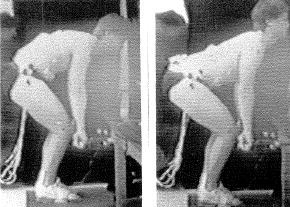
         Start position                                                 End position


Register for  Charlie Weingroff Seminar Oct 25-27, 2013


Topics: Charlie Weingroff, Hip Hinge

Integrated Care - Part VII: Mastering the Hip Hinge

Posted by Boston Sports Medicine and Performance Group on Mon, Oct 3, 2011 @ 07:10 AM

by Art Horne


Last week we discussed the importance of bringing all professionals who care for and provide performance services to your student-athletes together to develop a consistent teaching methodology and progression to mastering the squat pattern.  This week we look at the Hip Hinge.


hip hinge


Deadlift – Hip Hinge

Hip Hinge: all athletes should be able to separate their hips from a back strategy both in 2-legs and single leg stance -whether its knee, hip or other LE injury pain, we should be able to look at this movement pattern and address some overall concerns IN ADDITION to their traditional rehab program.

 
The hip hinge can be easily taught and standardized with our stick series.

Teaching Stick Series:


1. Stick maintains contact with three points (head, back and butt crack) throughout entire movement.
2. Reach butt backwards; knees should have slight bend.
3. Start with two feet on ground and progress to single leg stance.
4. This is not a squat pattern – be sure to hinge at the hips.
5. Maintain a packed neck (c-spine in-line with sternum throughout movement).


Start one foot away from wall (maybe just less) and reach back towards the wall with butt

1. Maintain three points of contact with stick on head, back and butt crack
2. This is not a squat pattern – first motion should be back towards the wall and not downwards.
3. Inch outwards from the wall with each successful repetition and repeat until you have found your end range.
4. ALTERNATIVE: face wall and touch with hands, move away from wall and repeat until you have reached max distance from wall while maintaining perfect form


Progression:


1. Two Leg Stick
2. SL Stick
3. 2-Leg – 2 hand Kettlebell Deadlift
4. SL 2-DB Deadlift
5. SL contralateral 1-DB Deadlift


When you finally get strength and sports medicine professionals together in the same room some amazing things begin to happen, especially when you start talking about hinging at the hips including:


1. Agreement to Pack the Neck: Packing the neck and maintaining a neutral cervical spine instead of admiring yourself in the mirror during a hip hinge stick series becomes a universal theme among both groups and taught and coached consistently – whether it’s pulling 300 pounds from the floor during a sumo squat or 4 weeks post ACL surgery during a simple stick series.  Knowing where an athlete is going and where they’ve come from is half the battle in my opinion.

2. Glute activation takes on a whole new meaning to athletic trainers when they see firsthand the work and technical coaching  that strength coaches employ with their athletes.  Sets of 3x10 for glute bridges and then discharge to full participation is no longer acceptable.

3. Bad Hip Hinge means Bad Back: In the same breath, strength coaches are able to discuss challenges with low back pain patients with sports medicine professionals and appreciate how important they are in the rehabilitation and care of those persons as well as how incredibly dangerous a poorly performed lift can be.
 

deadlift


Read article on Hip Hinge by clicking HERE.

Topics: basketball resources, basketball training programs, athletic training conference, athletic training, athletic training books, barefoot strength training, Hip Hinge, deadlift Art Horne